The information in this article applies to:

QUESTION
I have looked in the library browser and cannot find a window that is the shape I need for my plan. How can I create a window that is not square or rectangular-shaped?

ANSWER
In Chief Architect, different shaped windows are not found in the library; instead, they can be created by modifying a square or rectangular window. In this article, we will discuss:
To create a pentagon-shaped window
- Select Build> Window> Window
 and click at the location that you wish to create the custom window.
- Using the Select Objects
 tool, click on the window to select it, then click on the Open Object
  edit button.
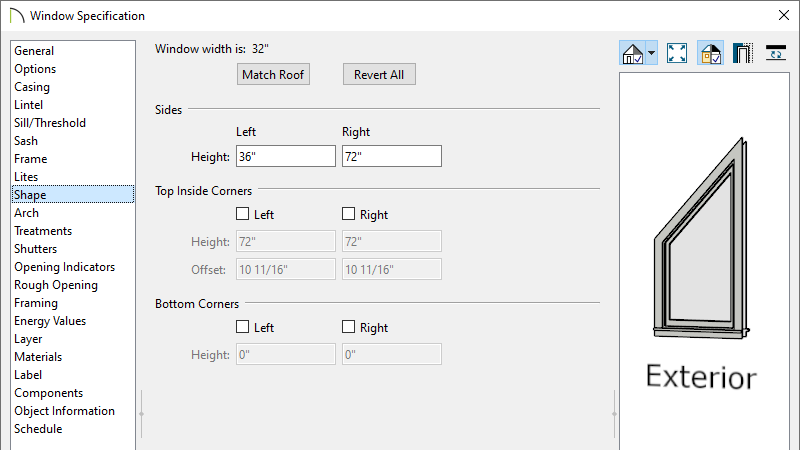
- On the Shape panel of the Window Specification dialog that opens:

- Specify the desired height of the left side using Left Height field.
- Specify the desired height of the right side using the Right Height field, though you may want to have this match the Left Height.
- Under the Top Inside Corners section, check either the Left or Right box.
- Specify the Height and the Offset for the Left/Right inside corner.
In this example, the Height is set to 96" and the Offset is set to 16". This tells the program that that an additional corner will be added at a height of 96" (measured from the bottom of the window), and it will be centered as the window is 32" wide.
- Press Tab on your keyboard to update the dialog without closing it, and notice the preview of the window on the right side of the dialog.
- Click OK to close the dialog and apply your changes.
To create a trapezoid-shaped window
- Select Build> Window> Window and click at the location that you wish to create the custom window.
- Using the Select Objects tool, click on the window to select it, then click on the Open Object edit button.
- On the Shape panel of the Window Specification dialog that opens:
- Specify the desired height of the left side using the Left Height field.
- Specify the desired height of the right side using the Right Height field.
- If desired, the corners can be adjusted further by checking the Left/Right boxes under the Top Inside Corners and Bottom Corners sections, opening up additional fields that can be adjusted.
- Press Tab on your keyboard to update the dialog without closing it, and notice the preview of the window on the right side of the dialog.
To align the top edge of the window with the pitch of the roof above, click the Match Roof button.
If you have any questions about the other options in this dialog, select the Help button at the bottom to open your program's documentation.
- Click OK to close the dialog and apply your changes.
To create a diamond-shaped window
-
Select Build> Window> Window and click at the location that you wish to create the custom window.
- Using the Select Objects tool, click on the window to select it, then click on the Open Object edit button.
- On the General panel of the Window Specification dialog that opens, set the Width and Height values.
In this example, the Width is set to 48" and the Height is set to 36".
- On the Sill/Threshold panel, uncheck Use Interior Sill and Use Exterior Sill.
- On the Arch panel:
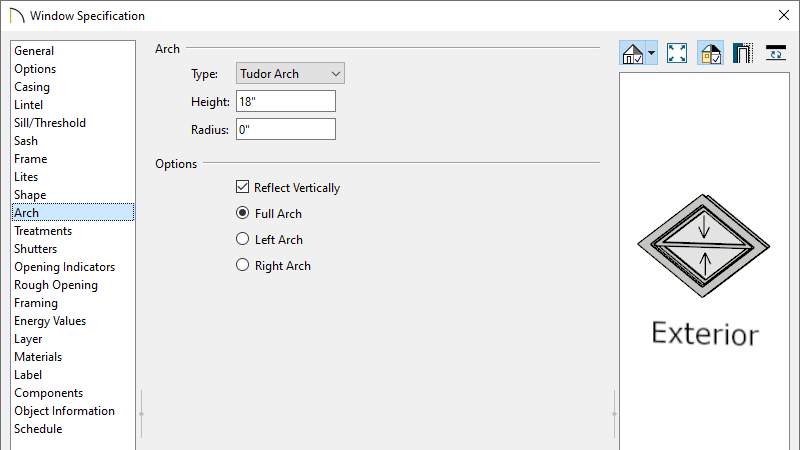
- Specify the Arch Type as Tudor Arch.
- Check the Reflect Vertically box.
Reflect Vertically will not be available if a lintel or sill is specified for the selected window.
- Set the Radius to 0".
- Specify the Height.
In this example, the Height is set to 18", which is half the height of the window itself.
- Press Tab on your keyboard to update the dialog without closing it, and notice the preview of the window on the right side of the dialog.
- Click OK to close the dialog and apply your changes.
