The information in this article applies to:

QUESTION
Is there a way to superimpose or reference the contents of Floor 1 on top of Floor 2 in a way that would allow me to edit Floor 2 while seeing where objects are located on Floor 1?
ANSWER
Although a given plan can have multiple floors, only one can be active for editing at a time. However, a reference floor can be superimposed on the working floor to help you keep walls and rooms aligned between floor levels or even different plans. This article describes some of the basics of the Reference Display tool.
Begin by opening a Chief Architect plan file.
In floor plan view, select Tools> Floor/Reference Display  to display the Floor/Reference Display sub-menu.
 Reference Display
This option displays a floor as a reference superimposed over the current floor plan. The contents of the reference plan cannot be edited; however, they can be used to position walls, stairs and other items in the plan.
 Change Floor/Reference
This opens the Change Floor/Reference dialog and allows you to specify your reference display layer settings, along with the ability to change what floors and which plans are referenced when using the Reference Display.
 Up One Floor
This option changes the active floor level to be the floor level above.
 Down One Floor
This option changes the active floor level to be the floor level below.
 Edit Reference Document Offset*
This option allows you to quickly adjust/offset a referenced plan file using the Rotate and Move edit handles without accessing the Change/Floor Reference dialog. If another plan is not being referenced, this option will be grayed out and inaccessible.
*Applies to Chief Architect Premier X15 and newer versions.
Using the Reference Display in 2D
- In floor plan view, select Tools> Floor/Reference Display>
 Change Floor/Reference.
- In the Change Floor/Reference dialog that displays, notice the two different sections that are available: Current Floor and Reference Display.
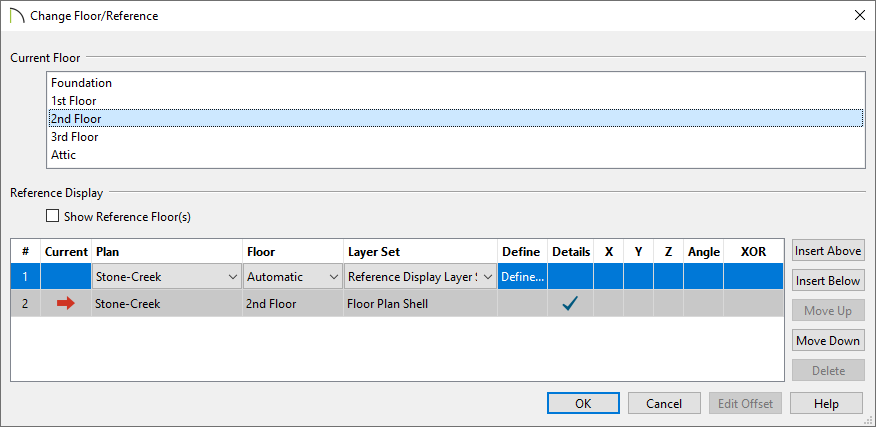
- The Current Floor section will display all of the floor levels in the plan, with the currently active floor highlighted.
In this example, the 2nd Floor is active in the plan.
- The Reference Display section contains the various settings pertaining to the reference that will be superimposed onto the currently active floor. Note that the row containing the red arrow in the Current column is the active Plan, Floor, and Layer Set you're currently working in.
- Focusing on the Reference Display section, use the Plan* and Floor drop-down menus to select the plan and floor level that you want to reference.
To reference a different plan entirely, select the Plan drop-down and click on Choose Existing Plan. An Open Plan File dialog will appear where you can select the plan file of your choice.
When "Automatic" is selected in the Floor drop-down, the floor level below the Current Floor is always used; if there is not a floor below, the floor above is used instead.
*Applies to Chief Architect Premier only.
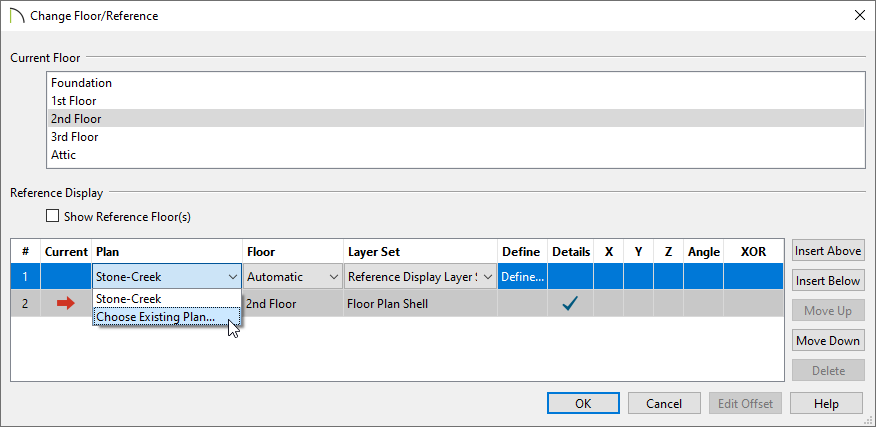
- Use the Layer Set drop-down to choose which layer set is used for the reference. By default, a predefined Reference Display Layer Set is specified. If you would like to customize this layer set, you can do so by clicking the Define button located under the Define column to open the Layer Display Options dialog.
To learn more about layers and layer sets, please see the Saved Plan Views, Layers & Annotations Training Video playlist, as well as the Layers & Layer Sets Knowledge Base category.
- The Details column allows for fill patterns to be displayed. When unchecked, only object edge lines are drawn. Details are always included for the Current Floor.
- X*, Y*, Z*, and Angle* columns are available when another plan is being referenced. These allow you to specify custom values that offset the referenced plan from the Current Floor. In addition to these fields, an Edit Offset button is available that allows you to quickly adjust/offset a referenced plan file using the Rotate and Move edit handles.
*Applies to Chief Architect Premier X15 and newer versions.
- XOR changes the color of reference lines when they are drawn on top of lines pertaining to the Current Floor. If the lines have identical properties, they are not drawn at all. When this is unchecked, reference colors don't change, and identical lines are not suppressed.
- The buttons on the right allow you to manage the list of references in the Reference Display table. New references use the "Automatic" floor behavior and the Reference Floor Layer Set by default. The Delete option will be grayed out and inaccessible if only one reference is present in the list, or if the Current row is selected.
- Once all of the settings here are to your liking, click OK.
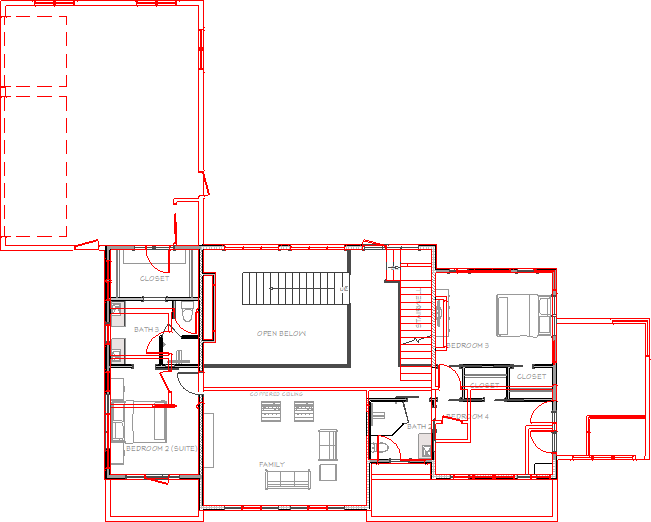
- Navigate to Tools> Floor/Reference Display> Reference Display
 to turn on the Reference Display. This is a toggle; simply select the tool again to turn the feature off.
In this example, the currently active floor level is the 2nd Floor, while the red reference lines are associated with the 1st Floor.
Using the Reference Display in 3D*
*Applies to Chief Architect Premier only.
- While in a 3D camera view, select Tools> Floor/Reference Display>
 Change Floor/Reference.
- Using the Plan drop-down, select a plan that is already being referenced, or click on the Choose Existing Plan option to prompt the Open Plan File dialog where you can select the plan file of your choice.
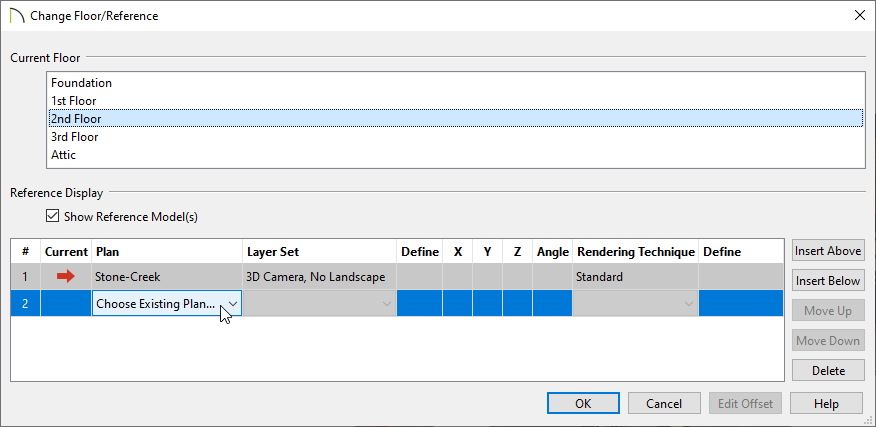
- Choose the Layer Set for the referenced plan file as well the Rendering Technique that you would like to use.
X*, Y*, Z*, and Angle* columns are also available allowing you to specify custom values that offset the referenced plan from the Current Floor.
*Applies to Chief Architect Premier X15 and newer versions.
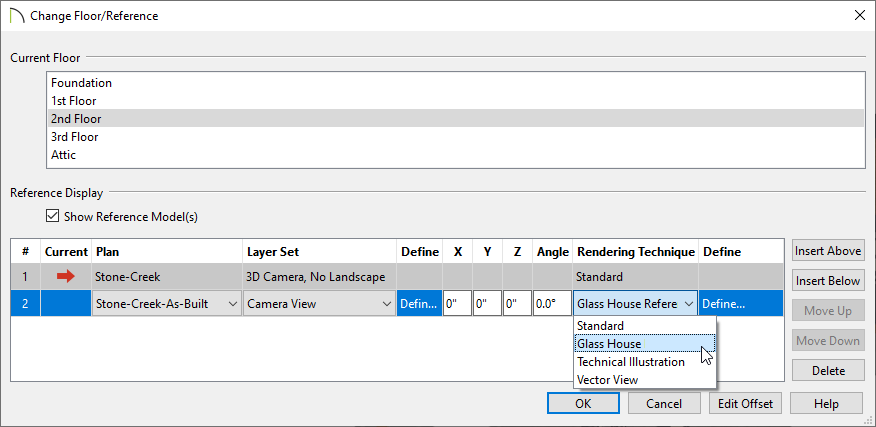
- To the right of the Rendering Technique drop-down is a Define column that, when clicked, contains additional settings that can be specified for the referenced 3D model. Do note that these settings vary based on the Rendering Technique selected.
- Click OK to close the dialog and see the referenced model appear in the 3D view.
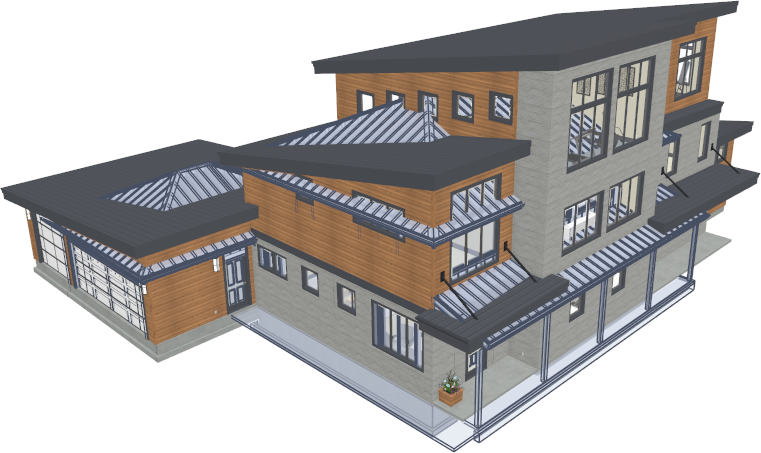

![]() to display the Floor/Reference Display sub-menu.
to display the Floor/Reference Display sub-menu. Reference Display
 Change Floor/Reference
 Up One Floor
 Down One Floor
![]() Edit Reference Document Offset*
Edit Reference Document Offset* Change Floor/Reference.

 to turn on the Reference Display. This is a toggle; simply select the tool again to turn the feature off.
 Change Floor/Reference.

