QUESTION
I have been looking at the CAD details in the Chief Architect CAD Blocks library folder, and these are not exactly what I'm wanting. Is there a way to edit one of these drawings to make it meet my particular needs?

ANSWER
The CAD Blocks library folder contains generic details that are intended to be a starting point for you to create the exact detail drawing that you're after.
When you find one that is similar to what you need but requires some changes, use the procedure below to explode the block and edit it as needed.
To customize a CAD block or detail
- You can place CAD drawings in any of several view types; however, CAD Detail windows are intended specifically to help you organize the CAD drawings in use in your plan.
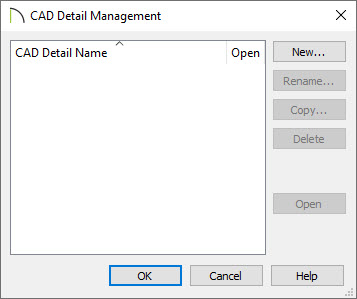
- Select CAD> CAD Detail Management
 from the menu.
- In the CAD Detail Management dialog, click the New button.
- In the Create New CAD Detail dialog, type a descriptive name for your new drawing, then click OK.
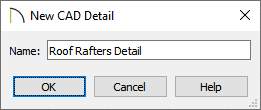
- A new CAD Detail window will open, ready for you to place and edit blocks and details.
- If the Library Browser side window is not already open, navigate to View> Library Browser
 .
.
- Navigate to Chief Architect Core Catalogs> CAD Blocks. If you downloaded the bonus catalog mentioned at the top of this article, you can also browse to Chief Architect Bonus Catalogs> CAD Blocks and Details.
- Browse to find a block or detail that is similar to what you need, then click on it to select it.
- When you move your cursor into your drawing area, your cursor will display the CAD Block
 icon. Click to place the selected CAD block at that location.
- Using the Select Objects
 tool, click on the newly placed CAD block to select it.
- Select the Edit CAD Block
 edit button to open a separate window. Notice that the CAD block is no longer a single, non-editable unit. Instead, you will be able to select and modify each individual CAD line, polyline, and text object.
In legacy versions, the Edit CAD Block tool did not exist. Instead, click the Explode CAD Block  edit button. Do note that a separate window will not open after activating this tool.
It is possible to nest a CAD block within another CAD block. If, after clicking the Edit/Explode CAD Block tool, you find an object that cannot be edited as expected, select the object, then click on the Edit/Explode CAD Block edit button once more to continue editing.
- Use Tools> Layer Settings> Display Options
 or Active Layer Display Options
  to change what layers are set to display in the default "CAD Block Detail Set".
In prior versions, this layer set may not be available. Instead, utilize the layer set named "Detail Layer Set".
- When your CAD detail has been edited to suit your needs, select Tools> Active View> Save Active View
 . You may be prompted with a Question dialog asking if you'd like to replace all instances of the block with the copy you have modified. Choose your desired option to proceed.
In legacy versions that don't contain the Edit CAD Block tool, instead create a selection marquee using the Select Objects tool, then click the Make CAD Block  edit button to block it back together.
- Your modified CAD detail can also be added to your library for future use; click on the CAD block to select it, then click the Add to Library
 edit button to add the block to the User Catalog folder within the Library Browser.