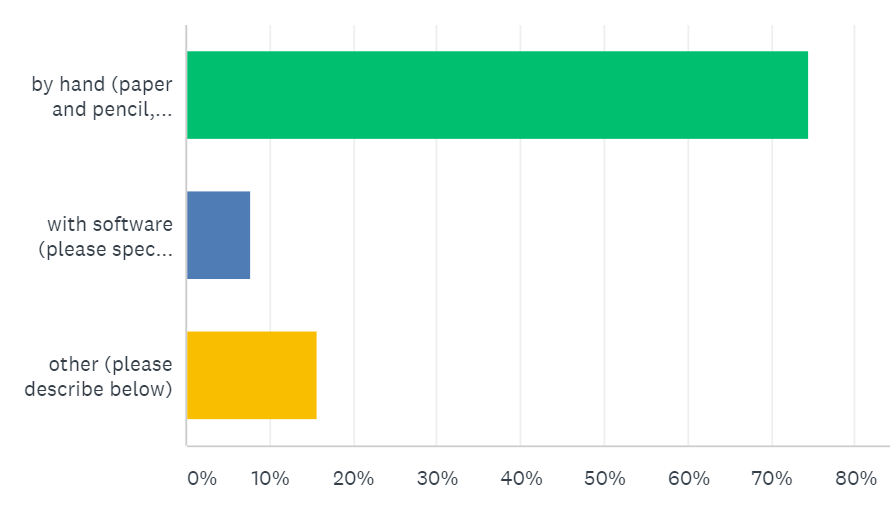
How do remodeling professionals capture as-built measurements? Paper, Napkin, App, or Laptop software? Chief Architect software surveyed remodelers and found 75% measure as-built homes by hand using paper and pencil. The compounding effects of repetition have made this an efficient process. If the system works, why change?
What is an As-Built plan?
The As-Built plan refers to the original condition of the house before remodeling. Remodeling projects and home additions start with as-built measurements, also called red-line drawings or record drawings. It’s vital to map out the as-built plan as precisely as possible.
In August 2019, Chief Architect surveyed over 50 remodelers asking three key remodeling questions:
1) How do you get your As-Built Measurements?
2) How do you import As-Built Measurements into Chief Architect?
3) What is your biggest need for Remodeling software?
1. For Remodeling Projects, how do you get your As-Built Measurements?
75% of remodelers measure as-built homes by hand using paper and pencil from the survey responses. Less than 8% use software. Reasons people are not using software vary, but many cite the efficiency of using technology at a client’s home.
There are many specialty apps designed to capture as-built measurements, the majority of people are still finding the most success with taking these measurements by hand and then later importing them into their remodeling software. Remodelers can simply do it faster on paper than struggling with a tablet app and they want to avoid being in a client’s home any longer than necessary. A detailed checklist for as-built measurements helps to avoid missing key information. You will find an As-Built Checklist below from David Heimann.
Respondents said they have tried one or more of the various mobile applications designed specifically for capturing as-built measurements. The overwhelming consensus seems to be that these apps can be frustrating because they cannot model real-life remodel conditions, such as misaligned walls, multiple stories, vaulted ceilings, etc. In fact, Chief Architect discontinued its own Room Planner app because it lacked the sophistication of Chief Architect’s desktop version. And now that laptops, such as the Microsoft Surface, are easily portable and work with Bluetooth lasers, remodelers have access to Chief Architect’s most powerful software for as-built measurements and conditions.
2. Do you import As-Built Measurements into Chief Architect Software?
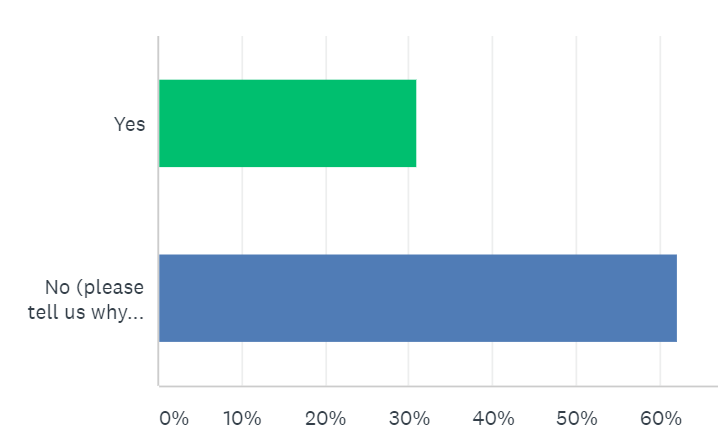
Just over 30% of respondents that use software for As-Built measurements import it into Chief Architect. Many manually input the measurements due to compatibility, such as files that are created as images, pdfs or proprietary formats.
3. What is your biggest need for Remodeling software?
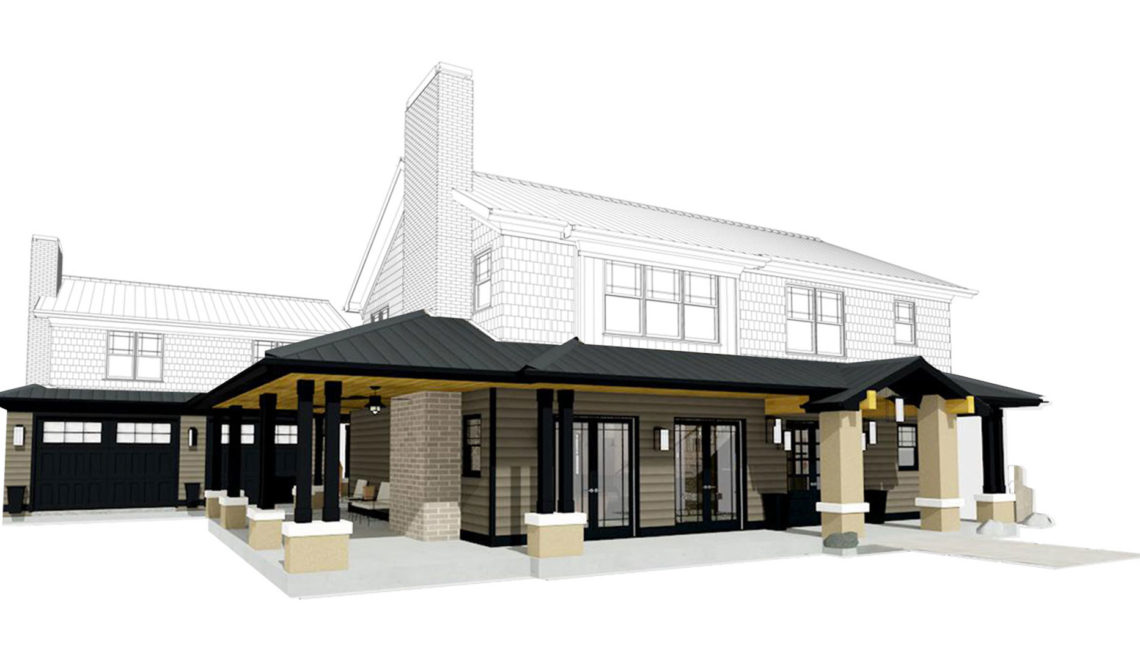
The most commonly cited request for remodeling software is help to isolate the “as-built” from “new” in a remodel project. In the construction drawings, people want to show walls that will be removed or how a new addition will be overlaid on the home. Some building departments may require the as-built overlay. A similar overlay in 3D could help the remodeler show the client how the new project compares to the current as-built. Chief Architect’s reference display can accomplish both of these tasks for overlaying an as-built in 2D & 3D – you can see how in this summary video.
At Chief Architect, we’re always striving to keep up with the latest trends in the remodeling industry, so that we can provide the best remodeling software available. Remodeling software enhancements are an important focus which is why we asked the survey questions and we will continue to ‘remodel’ our software. Thank you to our customers who took the time to answer the survey questions! Leave a comment below to let us know how you’re capturing your as-built measurements.
Remodeling Resources
How-to resources on remodeling using Chief Architect software
- Learn how to configure a Leica wireless Bluetooth laser meter with Chief Architect to help improve your as-built capture process
- Learn to use reference display to show as-built, demo and new construction components in plan views and 3D views
- Remodeling video playlist
As-Built-Existing Plan Checklist
Have you ever spent hours on-site only to get home to your drafting table or software to realize that you’re missing key information or measurements? The table below was provided to us from David Heimann at East Wind Designs.
| Checklist for Capturing As-Built - Exterior |
|---|
| Take Pictures of Exterior Elevations |
| Take Pictures of Exterior Perspectives |
| Take Pictures of Site, Lot, Terrain, Vegetation |
| Exterior Wall Thickness |
| Siding Material and Size |
| Ext. Window and Door Trim Material and Size |
| Locate all Ext. windows and doors |
| Locate Utilities, Meter Location, Electric (overhead, bury, etc.) Phone, etc. |
| Foundation Type, Size, Height Above Grade |
| Roof Pitch and Material |
| Sketch Elevations (Exterior) |
| Sketch Perimeter of Building or Dimension Google Earth Image |
| Site plan- Google Earch, MTCADASTRAL, Survey, etc. Locate and Dimension as Needed to Fill in Missing Info |
| Decks- Locate on Sketch, Note Railing Height, Spacing, Height above Grade and Related to Subfloor |
| Exterior Stairs, Locate on Sketch, Note Riser Height and Tread |
| Checklist for Capturing As-Built - Interior |
|---|
| Take Pictures of Interior Elevations |
| Take Pictures of Ceilings |
| Take Pictures of Floors |
| Interior Wall Thickness |
| Interior Wall Finish (Gyp. Bd, Plaster, etc.) |
| Sketch Floor Plan |
| Locate Interior Doors, Note Sizes on Sketch |
| Interior Door and Window Trim (Size, Material, Finish, Window Coverings) |
| Base trim (Size, Material and Finish) |
| Crown Molding (Size, Material and Finish) |
| Flooring Type (Per Room, Note on Sketch) |
| Fireplace-Locate and Detail on Sketch |
| Vaulted Ceilings- Which Room, Height at Peak |
| Ceiling Height(s), Note on Sketch Per Room |
| Cabinets (Locate, Describe and Detail on Sketch) |
| Countertops |
| Backsplash |
| Stairs-Locate on Sketch, Note: Rise, Run, Tread and Riser Height |
| Checklist for Capturing As-Built - Electrical and Plumbing Fixtures, HVAC |
|---|
| Outlet Locations (Kitchen and Bath) |
| Electrical Panel (Interior) Location |
| Switch Location and Lead to FIXTURE |
| Light Fixture and Locations |
| Furnace/Heat Source- Type, Size, Location |
| Water Heater |
| Plumbing Fixtures Located on Sketch |

 By
By 



8 comments