Resolving a Gap Between Floors in Camera Views


Reference Number: KB-00038
Last Modified: June 3, 2024

The information in this article applies to:

Chief Architect Premier or Chief Architect InteriorsVertical SeparatorHome Designer Professional or Home Designer Architectural


QUESTION

When I look at my plan in a Full Overview, there is a noticeable gap between each floor. What causes this and how do I fix it?

Gap in the building between the first and second floors


ANSWER

A gap between floors is typically caused by modifying the Platform option in your Wall Type Definitions dialog so that it is on the exterior surface line of the wall type. By default, this option is checked for the exterior side of the Main Layer. This article will walk you through restoring the Main Layer if it was inadvertently changed.

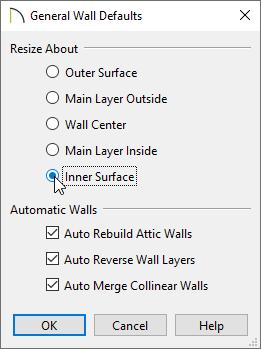
To ensure that existing walls in your plan do not move when changing the wall type's Main Layer, you first need to modify the General Wall Defaults.


To edit the wall defaults*

*Applies to Chief Architect Premier and Chief Architect Interiors. Home Designer programs do not have control over this setting, so if you're using one of these versions, keep in mind that the walls will move when you correct the wall type, which is mentioned in the next section.

  1. Select Edit> Default Settings from the menu.


  2. In the Default Settings dialog, navigate to Walls> General Wall, then click on the Edit button.


  3. In the General Wall Defaults dialog that opens, set the radio button for Resize About to Inner Surface and click OK.

    Note: In most circumstances, it is recommended that you Resize About the Main Layer Outside to avoid unexpected results, so at the end of this article, you will want to restore this setting before continuing to work in the plan.

    General Wall Defaults with Inner Surface selected under Resize About


To fill in the gap between floors

  1. Using the Select Objects  tool, click on one of the exterior walls, then select the Open Object  edit button to display the Wall Specification dialog.
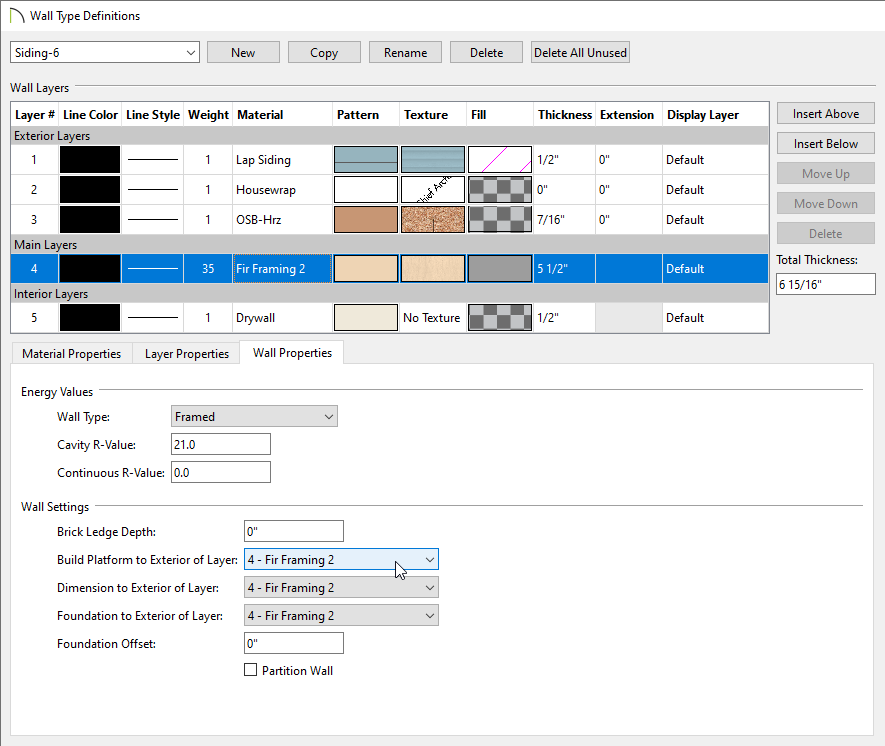

  2. Select the Wall Types panel, then click on the Define button next to the Wall Type drop-down to display the Wall Type Definitions dialog.

    Note: The dialog below may appear slightly different depending on the product and version you're using.

    Wall Type Definitions dialog with the main layer selected

    • Set the Main Layers. By default, this is typically the structural or framing layer, which is often the thickest layer within the wall.

    • Access the Wall Properties tab and set the Build Platform to Exterior of Layer* setting to use the same structural or framing layer.

      In X14, Home Designer 2023, and prior versions, separate tabs with different settings were not available. Instead, you can locate this setting under the Wall Settings section.

      *Applies to Chief Architect Premier, Chief Architect Interiors, and Home Designer Pro only

    • Ensure the wall type has a layer in the Exterior Layers section.


  3. Click OK on each of the dialogs to confirm the changes.


  4. Verify that the gap between floors is now filled in by creating a Perspective Full Overview .


If the gap is still present after following the steps above, it's possible that you may need to reset your wall heights if you're using Chief Architect Premier, Chief Architect Interiors, or Home Designer Pro.


To reset wall heights*

*Applies to Chief Architect Premier, Chief Architect Interiors, and Home Designer Pro only

  1. Select Edit> Reset to Defaults from the menu.


  2. In the Reset to Defaults dialog that opens:

    Reset to Defaults dialog with Wall Top Heights and Wall Bottom Heights checked.

    • Set the Reset Scope to All Floors.

    • Place checkmarks in Wall Top Heights and Wall Bottom Heights.

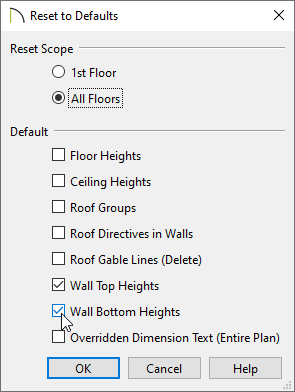
      Wall heights can be modified in 3D views. Checking these boxes will reset the the heights back to their default values.


  3. Click OK.