QUESTION
I would like to send a plan file to someone. What is the best way to send them the file so that they can see all of the materials and other related files, including those that I have created and imported?
ANSWER
Chief Architect plans and layouts often contain many references to other external files so it's necessary to copy all the associated files to a new location when a plan or layout is moved. A copy of your plan along with all of your textures and materials can be quickly created by using the Backup Entire Plan/Layout tool.
Reasons you might want to use the Backup Entire Plan/Layout tool include:
-
Sending the file to someone using the Chief Architect Desktop Viewer.
-
Submitting a plan to Chief Architect Technical Support for evaluation and troubleshooting.
-
Working with a colleague on plan changes.
-
Migrating legacy files created in older program versions.
-
Transferring files to another computer or sending them to another user.
-
Archiving or backing up your work.
To use the Backup Entire Plan/Layout Tool
- Access plan or layout* that you want to send to the person who will be viewing the file.
*Layouts are only available in Chief Architect Premier, Chief Architect Interiors, and Home Designer Pro.
- Select File> Backup Entire Plan/Layout
 and in the dialog that displays:

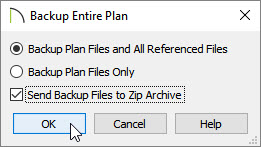
- Ensure that the Backup Plan Files and All Referenced Files option is selected.
- Check the Send Backup Files to Zip Archive box to create a compressed/zipped folder, if desired.
- Click OK.
- Browse to an easy to find location, such as your Desktop, then click Save.
- If backed up from a plan, a copy of the plan file, including the associated files such as images, textures, and backdrops will now be backed up. If backed up from the layout*, a copy of the layout, all plan files sent to the layout, and the associated files such as images, textures, and backdrops will now be backed up.
*Layouts are only available in Chief Architect Premier, Chief Architect Interiors, and Home Designer Pro.
-
You're now ready to send the compressed/zipped folder to another computer, another Chief Architect user, or to Chief Architect Technical Support using the Technical Support Center.
If sending your files to Chief Architect Technical Support, please do not use third party compression utilities in order to submit different compressed file types such as .zipx, .7z, and .rar files.


