QUESTION
I would like to display additional stair details in plan view, such as a breakline, tread overhangs, railings, and newel posts?
ANSWER
You can specify how different stair components are displayed in plan view by accessing the Staircase Specification dialog.
To display a stair breakline
- Using the Select Objects
 tool, select the staircase and then click the Open Object
  edit button.
In the instance that the staircase has multiple stair segments, such as switchback or L shaped staircases, select the segment that will need to contain the breakline.

- On the Breakline panel of the Staircase Specification dialog that opens, check the Has Breakline box.
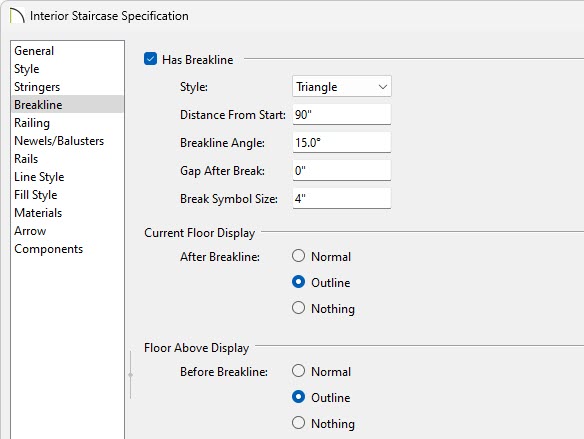
- Select the breakline Style using the drop-down.
- Specify the Distance From Start, which is the distance from the front of the stair segment to the breakline, measured from the staircase's center line.
- Specify the Breakline Angle. An angle of 0 produces a breakline that is perpendicular to the sides of a straight staircase.
- Specify the Gap After Break if desired. This creates a second breakline and specifies the distance between the two. A value of 0 produces no gap.
- Specify the Break Symbol Size, which is the total height of the break symbol measured from the top corner to the bottom corner.
- The Current Floor Display section controls the appearance of the portion of the staircase located after the breakline on the floor where the stairs are drawn.
- The Floor Above Display section controls the appearance of the portion of the staircase located before the breakline, as seen from the floor above where the stairs are drawn.

3. If you'd like to use these stair settings in other projects, you can use the
Select Objects tool to select the staircase, then use the
Add to Library 
edit tool to add the staircase to your User Catalog for future use*.
*Applies to X16 and newer versions.
To display newels, balusters, and handrails
- Using the Select Objects tool, select the staircase and then click the Open Object edit button.
- On the Newels/Balusters panel of the Staircase Specification dialog, remove the check from Use Defaults under the Plan Display section.

- Check Draw Newels to display newel posts.
- Check Draw Balusters to display balusters.
- Check Draw Rails to display the handrails.
Handrails draw over the top of newels and balusters. When displaying the handrail together with newels and/or balusters, use the Fill Style button to set the fill style to "None".

3. If you'd like to use these stair settings in other projects, you can use the
Select Objects tool to select the staircase, then use the
Add to Library* edit tool to add the staircase to your User Catalog for future use*.
*Applies to X16 and newer versions.
To display tread overhand and stringers
- From the menu, select Tools> Layer Settings> Display Options
 .
.
- In the Layer Display Options dialog, use the Name Filter to search for "Stairs."
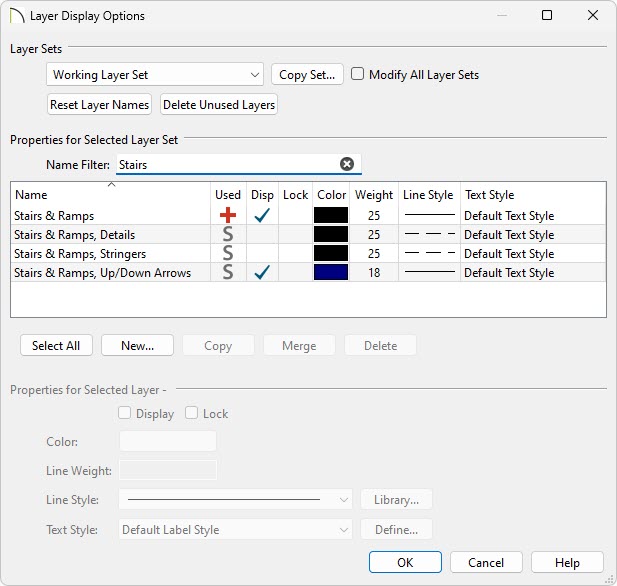
- Locate the "Stairs & Ramps, Details" layer as well as the "Stairs & Ramps, Stringers" layer.
- Put a check in the Disp column for for the "Stairs & Ramps, Details" layer to display the tread overhang.

- Put a check in the Disp column for for the "Stairs & Ramps, Stringers" layer to display the stringers.
